

Key takeaways
- Foam density and construction: Dense foam generally keeps its shape better under repeated impacts, while softer outer layers can make contact feel less abrupt. Layered foam can balance cushioning and resistance. Since density is rarely disclosed in comparable units, look for clear construction details and a warranty, and ask the seller how the pad is intended to be used.
- Thickness and impact absorption: Extra thickness provides more material to absorb and distribute force, especially for strong kicks. It also adds bulk and can make the target harder to hold in position. A thin pad may work for light technique drills but can bottom out under hard strikes.
- Handle placement: A rear handle near the center helps control the shield, while lower or side handles can make it easier to brace against the torso or adjust its angle. Multiple attachment points are useful only if they are securely anchored. Avoid designs that force the holder to grip a narrow strap with bent wrists or put fingers where a kick can catch them.
- Stitching and seams: Inspect handle attachment points, corners, and the perimeter seam. These areas take repeated pulling and impact. Double stitching or reinforced patches are useful signs, but stitching cannot compensate for weak backing material or loose handles.
- Shape and dimensions: A curved face can help keep round kicks centered. A flatter face may suit straight kicks and knees. Compare usable striking area—not just overall length—and check that the pad fits your storage space and the holder’s frame.
Best Kick Shields for Martial Arts Training
The best kick shield for most partner training is a curved, medium-to-large shield about 24–30 inches long, 14–16 inches wide, and 4–6 inches thick, with dense layered foam, reinforced stitching, and handles that let the holder brace it without twisting their wrists. Choose a lighter, narrower shield for speed and frequent movement; choose a thicker, broader one for powerful kicks and broader coverage. For solo drills, a freestanding bag or securely mounted pad is usually more practical than a handheld shield.
Kick shield comparison by training need
Specifications vary by model, and manufacturers do not use a single standard for foam density or dimensions. Treat the ranges below as practical buying targets, not guarantees of equal performance. A product’s actual feel depends on foam construction, shape, and how it is held.
Our top picks

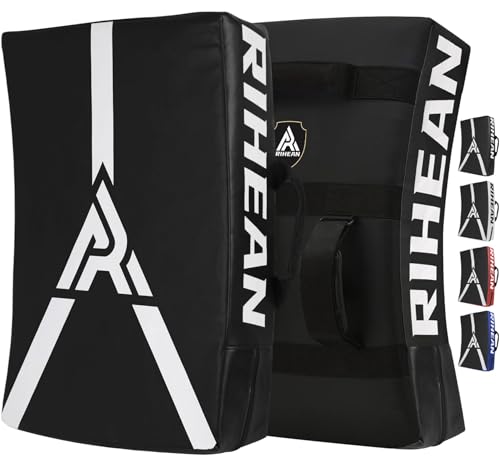


As an Amazon Associate we earn from qualifying purchases at no extra cost to you. Ratings are shown as listed on Amazon.
| Type | Typical dimensions | Typical thickness | Approx. weight | Best fit |
|---|---|---|---|---|
| Compact Thai pad | 15–18 × 8–10 in | 3–4 in | 2–4 lb | Fast combinations, knees, and limited storage |
| Standard kick shield | 24–30 × 14–16 in | 4–6 in | 4–8 lb | General partner practice and mixed kick drills |
| Large heavy shield | 30–36 × 16–20 in | 6–8 in | 7–12 lb | Experienced holders and higher-impact training |
| Curved shield | 24–30 × 14–18 in | 4–6 in | 5–9 lb | Keeping round kicks centered and reducing edge misses |
Choose by the way you train
For a first shield or a shared home gym
Look for a standard shield around 24–28 inches long and 4–5 inches thick. This gives a newer holder a manageable target without being so small that every kick demands precise placement. A medium-weight model is easier to reposition between body kicks, front kicks, and knees. If several people will use it, prioritize reinforced handles and a wipe-clean outer cover over decorative features.
For hard kicks and experienced holders
Choose a larger shield, generally 6 inches thick or more, with dense layered foam and broad, reinforced straps or handles. More thickness can help spread impact, but it does not make a shield safe to hold without proper bracing. A very large, heavy pad can tire the holder and slow combinations; match its mass to the strength and experience of the person holding it.
For speed drills and frequent repositioning
A compact pad or lighter standard shield is easier to move quickly and keep aligned. The tradeoff is less coverage: kicks near the edges are more likely to miss or strike the holder’s arms. Use compact pads for controlled combinations and drills where the kicker can reliably aim, rather than as a catch-all target for maximum-power work.
For solo practice
A handheld shield needs another person to hold and reposition it. If you train alone, consider a freestanding heavy bag, a securely mounted kicking target, or a shield specifically designed to attach to a stable structure. Do not wedge a handheld shield against an unstable chair, door, or improvised stand; it can slide or tip under impact.
What matters beyond the listed specs
- Foam density and construction: Dense foam generally keeps its shape better under repeated impacts, while softer outer layers can make contact feel less abrupt. Layered foam can balance cushioning and resistance. Since density is rarely disclosed in comparable units, look for clear construction details and a warranty, and ask the seller how the pad is intended to be used.
- Thickness and impact absorption: Extra thickness provides more material to absorb and distribute force, especially for strong kicks. It also adds bulk and can make the target harder to hold in position. A thin pad may work for light technique drills but can bottom out under hard strikes.
- Handle placement: A rear handle near the center helps control the shield, while lower or side handles can make it easier to brace against the torso or adjust its angle. Multiple attachment points are useful only if they are securely anchored. Avoid designs that force the holder to grip a narrow strap with bent wrists or put fingers where a kick can catch them.
- Stitching and seams: Inspect handle attachment points, corners, and the perimeter seam. These areas take repeated pulling and impact. Double stitching or reinforced patches are useful signs, but stitching cannot compensate for weak backing material or loose handles.
- Shape and dimensions: A curved face can help keep round kicks centered. A flatter face may suit straight kicks and knees. Compare usable striking area—not just overall length—and check that the pad fits your storage space and the holder’s frame.
A practical buying decision
| Your situation | What to prioritize | Compromise to expect |
|---|---|---|
| New holder, occasional practice | 24–28 in length, 4–5 in thickness, moderate weight, secure central handle | Less suited to repeated maximum-power kicks |
| Experienced pair, regular hard rounds | 6–8 in thickness, dense layered foam, reinforced handle anchors, broad target | Heavier and more tiring to reposition |
| Small room or shared storage | Compact or standard shield with a hanging loop and wipe-clean cover | Less coverage than a large shield |
| Fast combinations and movement drills | Lightweight, easy-to-angle pad with secure side and rear grips | Requires accurate targeting and a skilled holder |
| Training alone | Freestanding or mounted target designed for solo use | Not as easy to move or adjust as a partner-held shield |
Price and ownership realities
As a general market guide, compact pads often fall around $25–$60, standard shields around $40–$100, and larger or more heavily reinforced models around $80–$160 or more. Construction, size, and brand affect pricing; a higher price alone does not confirm better foam or stronger handle anchors. If possible, inspect the handle stitching and press across the striking surface to check for obvious thin spots or uneven filling.
The outer cover, seams, and handle attachments usually show wear before the foam visibly fails. Watch for a handle that pulls away, opened stitching, cracks in the cover, persistent deformation, or foam that feels locally collapsed. Stop using a damaged shield for hard-impact drills: a loose handle can cause the holder to lose control, and a collapsed area offers less consistent protection.
After training, wipe the surface with a damp cloth and mild soap if needed, then let it air-dry fully away from direct heat. Avoid soaking the foam or storing a damp shield in a closed bag, which can encourage odor and material deterioration. Rotate the striking area when practical so one spot does not take every kick.
How to check fit before committing
Have the intended holder grip the shield in the positions they will use during training. The pad should stay stable against their body without forcing their wrists into an awkward angle. Then check that the kicker can reach the center with the planned techniques while the holder remains balanced. For a rough coverage check, compare the shield’s usable width with the kicker’s expected landing variation: a 14-inch target gives 7 inches either side of its center, while a 10-inch pad gives only 5. That difference matters when drills involve movement or less experienced kickers.
Start new equipment with controlled strikes and confirm that the shield does not bottom out, shift, or strain the holder’s grip. Increase intensity gradually, and stop if either partner cannot maintain a stable position. A shield is training equipment, not a substitute for coaching or appropriate protective gear.




Write Your Review
No reviews yet. Be the first to share your experience!