

Key takeaways
- For a shallow 16- to 18-inch sink, begin with a 4- to 5.5-inch reach.
- For a conventional undermount or drop-in sink, 5.5 to 7 inches is usually easier to position.
- For a vessel sink, measure from the wall to the inside center of the bowl, then account for the vessel’s height and rim.
- A swivel spout can help serve two wash positions, but its swing path must not hit a mirror, backsplash, or adjacent wall.
The best wall mount bathroom faucets are chosen by matching spout reach, rough-in depth, mounting height, finish, and flow rate to the sink and wall—not by appearance alone.
Quick picks by bathroom situation
| Bathroom situation | Best faucet profile | Recommended reach | Useful flow rate | Why it works |
|---|---|---|---|---|
| Small powder room | Compact single-handle wall mount | 4 to 5.5 inches | 1.2 to 1.5 gallons per minute | Preserves counter space and reduces splash risk in a shallow basin |
| Standard 20- to 24-inch vanity | Two-handle or minimalist single-handle faucet | 5.5 to 7 inches | 1.2 to 1.5 gallons per minute | Places the stream near the basin center without excessive projection |
| Wide vessel sink | Long-reach wall mount with adjustable rough-in | 7 to 9 inches | 1.2 to 1.5 gallons per minute | Clears the vessel rim and reaches far enough into the bowl |
| High-use family bathroom | Single-handle ceramic-disc faucet | 5.5 to 7 inches | 1.2 gallons per minute | Fast temperature adjustment with fewer external parts to service |
| Accessible remodel | Lever-handle faucet with clear knee and hand clearance | 5 to 7 inches | 1.2 gallons per minute | Large lever is easier to operate than small cross handles |
Spout reach is the first fit measurement
Spout reach is the horizontal distance from the finished wall to the outlet where water leaves the faucet. It is not necessarily the same as the overall faucet length. Measure from the finished wall surface, not from the wall framing or the back of the trim plate.
Our top picks


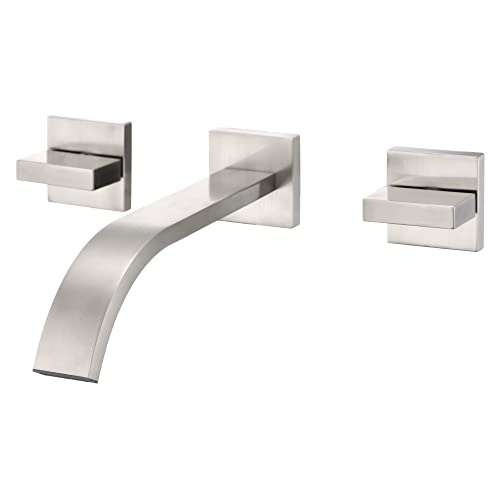

As an Amazon Associate we earn from qualifying purchases at no extra cost to you. Ratings are shown as listed on Amazon.
The water stream should normally land close to the drain or slightly toward the user side of the basin. A stream that falls behind the drain can splash against the rear wall; one that lands too far forward can splash onto the counter or user. For many rectangular bathroom sinks, the target is within roughly 1 inch of the drain centerline.
How to calculate suitable reach
Use this simple measurement:
Required reach = distance from finished wall to desired stream location − faucet outlet offset.
For example, if the desired stream location is 6.5 inches from the finished wall and the faucet’s outlet projects 1 inch beyond its mounting body, the required reach is approximately 5.5 inches. Always check the manufacturer’s technical drawing because brands measure reach differently.
- For a shallow 16- to 18-inch sink, begin with a 4- to 5.5-inch reach.
- For a conventional undermount or drop-in sink, 5.5 to 7 inches is usually easier to position.
- For a vessel sink, measure from the wall to the inside center of the bowl, then account for the vessel’s height and rim.
- A swivel spout can help serve two wash positions, but its swing path must not hit a mirror, backsplash, or adjacent wall.
Rough-in requirements: the part hidden behind the wall
A wall mount bathroom faucet is not a drop-in replacement for a deck-mounted faucet. It needs a concealed valve or rough-in body secured inside the wall, plus hot and cold supply connections placed at the correct spacing and depth.
| Specification | Common range | What to verify before purchase |
|---|---|---|
| Valve spacing | Approximately 4 to 8 inches center-to-center | Exact spacing and whether the trim is adjustable |
| Supply connection | Usually 1/2-inch plumbing connections | NPT, IPS, compression, or proprietary connection type |
| Finished-wall depth | Often about 1.5 to 2.5 inches of adjustment | Rough-in body adjustment range and required finished-wall thickness |
| Typical mounting height | 36 to 42 inches above finished floor | Sink rim height, user comfort, backsplash, and local requirements |
| Typical bathroom flow limit | 1.2 or 1.5 gallons per minute | Certification, local code, and whether an aerator is included |
Rough-in depth matters because trim cannot correct a valve installed too far forward or too far back. Wall thickness may change after waterproofing, backer board, tile, or stone is installed. The plumber should position the valve using the manufacturer’s finished-wall reference, not an assumed drywall thickness.
If the wall is already closed, choose a faucet only after identifying the existing valve brand, spacing, and connection configuration. Some trim kits are compatible only with their matching rough-in valve. Mixing a decorative trim set with an incompatible concealed valve can require opening the wall again.
Choosing mounting height for comfort and splash control
There is no single universal height. A practical starting point is to place the outlet about 4 to 6 inches above the sink rim, then confirm that the stream reaches the basin center. With a vessel sink, the valve may need to sit higher than it would for an undermount sink.
- For a standard vanity, a finished outlet around 36 to 42 inches above the floor is a useful planning range.
- Keep the handle comfortably reachable without forcing the user to lean over the basin.
- Leave enough clearance for handwashing, but avoid an unnecessarily high outlet that increases splash.
- Check mirror and backsplash dimensions before fixing the height.
- For a bathroom used by children, prioritize reach and handle access over a purely symmetrical appearance.
Make a cardboard or painter’s-tape mock-up of the faucet body, handle arc, and stream location before tile is installed. This inexpensive step can reveal that a visually centered faucet is functionally too far forward or too close to the mirror.
Finish comparison: appearance versus maintenance
| Finish | Best for | Maintenance reality | Common risk |
|---|---|---|---|
| Polished chrome | Traditional, modern, and budget-conscious remodels | Easy to wipe and widely available | Shows water spots and fingerprints |
| Brushed nickel | Busy family bathrooms | Usually disguises light spots and smudges | Texture can hold mineral residue if neglected |
| Matte black | High-contrast contemporary designs | Needs gentle cleaning to protect the surface | White scale and abrasive marks can be conspicuous |
| Polished brass or gold-tone finish | Decorative and traditional remodels | Wipe frequently with a soft cloth | Harsh chemicals may damage the coating |
| Stainless or steel-tone finish | Industrial and understated bathrooms | Generally practical when the coating is durable | Finish names vary; confirm whether the surface is plated or PVD-coated |
A PVD finish is often worth considering in a high-use bathroom because the color is applied through a durable vapor-deposition process. It is not indestructible, however. Avoid scouring pads, powdered cleaners, bleach-based products, and acidic descalers unless the manufacturer specifically permits them.
Flow rate: do not choose by pressure alone
Most bathroom faucets are limited to 1.2 or 1.5 gallons per minute. A lower-flow model can use less water, but the perceived strength also depends on household pressure, the aerator, supply-line condition, and whether sediment is restricting the outlet.
A useful ownership calculation shows the difference. Suppose a faucet is used for 20 handwashing cycles per day, with water running for 15 seconds each time:
- At 1.5 gallons per minute: 20 × 0.25 minutes × 1.5 = 7.5 gallons per day.
- At 1.2 gallons per minute: 20 × 0.25 minutes × 1.2 = 6 gallons per day.
- Difference: approximately 1.5 gallons per day, or about 548 gallons per year.
That calculation assumes the same run time. A faucet that feels too weak may cause users to leave it running longer, reducing the practical savings. For most bathrooms, a well-designed 1.2-gpm aerator provides a good balance; choose 1.5 gpm when a larger basin or faster filling is more important.
Which faucet type fits your remodel?
| Your priority | Recommended choice | Trade-off |
|---|---|---|
| Lowest initial cost | Basic chrome two-handle faucet with a standard rough-in | More visible parts and potentially more frequent handle maintenance |
| Easy daily temperature control | Single-handle ceramic-disc faucet | Requires adequate side clearance for the lever |
| Classic appearance | Two-handle faucet in chrome, nickel, or brass-tone finish | Two cartridges or valves can mean more service points |
| Minimalist appearance | Separate slim spout and concealed single control | More planning is needed for spacing and service access |
| Long-term serviceability | A major-brand faucet with replaceable cartridges and a documented rough-in | May cost more than an unbranded decorative set |
Brands such as Kohler, Delta, Moen, GROHE, Hansgrohe, Pfister, and Brizo offer wall-mounted bathroom faucet families or compatible components, but specifications vary by collection. Treat the brand name as a starting point, then verify the technical sheet for reach, rough-in compatibility, flow rate, cartridge type, and replacement-part availability.
Installation and ownership issues that matter
Have the rough-in installed and pressure-tested before the wall is closed. Confirm hot-water orientation, valve depth, supply connections, and the location of any service stops. After the trim is installed, flush the lines before fitting the aerator; construction debris can clog it immediately.
- Clean mineral deposits with diluted manufacturer-approved cleaner and a soft cloth.
- Remove and rinse the aerator when flow becomes uneven or sprays sideways.
- Do not use the spout or trim as a handhold; concealed fittings are not intended to support body weight.
- Replace worn cartridges or seals rather than overtightening a dripping handle.
- Inspect the escutcheon seal if water is collecting around the wall penetration.
- Keep the installation manual and rough-in model number for future cartridge and trim orders.
The parts most likely to wear first are the cartridge, O-rings, aerator, and decorative finish at frequently touched areas. Hard water accelerates aerator blockage and can shorten cartridge life. A faucet with accessible replacement parts may cost less over ten years than a cheaper model that requires replacing the entire trim assembly.
Final buying checklist
- Measure the finished-wall-to-drain distance and select the correct spout reach.
- Confirm whether the package includes the concealed rough-in valve.
- Match valve spacing, connection type, and finished-wall depth exactly.
- Set the mounting height around the sink rim, mirror, backsplash, and primary users.
- Choose 1.2 gpm for efficiency or 1.5 gpm when faster flow suits the basin and local rules.
- Prefer a finish that matches your cleaning habits, not just the room’s color palette.
- Verify cartridge, aerator, gasket, and finish-care support before ordering.
For most remodels, the safest all-around choice is a 5.5- to 7-inch wall mount faucet with a 1.2-gpm ceramic-disc valve, adjustable rough-in depth, and a finish that is easy to maintain. Compact sinks need shorter reach, vessel sinks often need longer reach and a higher outlet, and any concealed installation deserves careful measurement before the wall is closed.

Write Your Review
No reviews yet. Be the first to share your experience!