

Key takeaways
- What wears first: silicone covers stretch, fabric liners stain, rubber bands lose elasticity, and inexpensive plastic spatulas can split at the handle.
- What lasts: a thick glass jar, stainless-steel dough whisk, and stainless bench scraper can remain useful for years if dried properly.
- How to clean dried starter: soak the jar in cool or lukewarm water first. Very hot water can bake flour paste onto the glass. Scrape residue before washing.
- When a second jar helps: keep one jar for the active culture and use the other for mixing or storing discard. This prevents scraping around an active starter while it is rising.
- Common mistake: judging readiness only by the surface. A starter can look bubbly but still be weak; track its rise and fall after feeding.
The best sourdough starter kits for beginners are the ones with a healthy, clearly dated starter, a wide 750–1,000 ml jar, an easy-to-read temperature guide, and tools that simplify feeding without creating extra cleanup.
For most first-time bakers, a complete kit with a live starter, straight-sided jar, breathable cover, feeding markings, and a small dough whisk is the safest choice. If you already have jars and a kitchen scale, buying dried starter or a starter culture alone is usually better value. If your kitchen temperature changes substantially, prioritize temperature guidance or a controlled proofing device over decorative accessories.
Our top picks
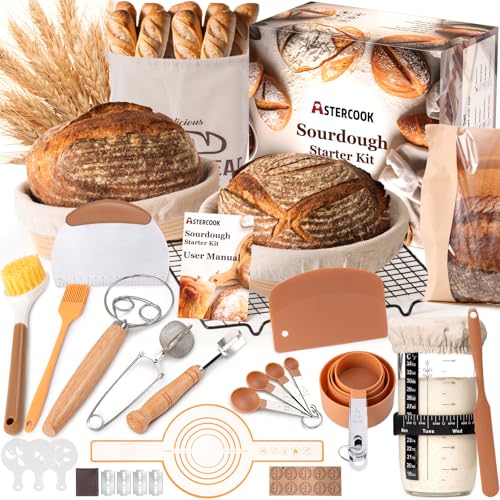


As an Amazon Associate we earn from qualifying purchases at no extra cost to you. Ratings are shown as listed on Amazon.
Best sourdough starter kits by situation
| Situation | Best kit type | Useful specifications | Typical market range |
|---|---|---|---|
| Making a first loaf on a budget | Live-starter basic kit | 750–1,000 ml jar, cover, feeding guide, starter culture | $20–$35 |
| Wanting fewer measuring mistakes | Complete feeding kit | Digital scale, 1,000 ml jar, silicone spatula, feeding schedule | $35–$65 |
| Cool or inconsistent kitchen | Starter kit with temperature tools | 18–28°C guidance, thermometer, insulated or temperature-controlled option | $40–$200+ |
| Baking weekly or more | Reusable jar-and-tool kit | Two jars, replacement lids, durable whisk, clear volume markings | $30–$70 |
| Already own a scale and jars | Dried starter or culture only | 50–100 g culture, reactivation instructions, flour recommendations | $8–$20 |
What separates a useful starter kit from a gift-box bundle
Starter quality and instructions
A live starter is convenient because it removes several days of reactivation, but it is also perishable. Look for a packing date, feeding instructions based on weight, and clear advice about storage and revival. A good instruction sheet explains what an active starter looks like: visible bubbles, a pleasantly sour aroma, and a rise after feeding. It should not rely only on vague directions such as “feed daily.”
Dried starter is more resilient during shipping and storage, but it normally requires several feedings before it reliably doubles. That is not a defect; it is the trade-off for a lower-maintenance product. Choose dried culture if delivery timing is uncertain or you do not expect to bake soon.
Jar capacity and shape
A 750 ml jar works for modest quantities, but a 1,000 ml jar is more forgiving. A starter can double or triple after feeding, and a narrow jar may overflow before you notice the rise. Straight sides make growth easy to measure; shoulder-shaped preserving jars are attractive but can trap starter above the main mixture.
The best jar material for most kitchens is thick glass with a wide opening. Glass does not retain odors and lets you see bubbles and height changes. A plastic deli container is lighter and less breakable, but softer plastic can scratch during cleaning. A screw lid should rest loosely or have an intentionally vented design. Sealing an actively fermenting starter tightly can allow pressure to build.
Feeding tools
A small silicone spatula is more useful than a large collection of branded utensils. It scrapes the jar walls clean and reduces waste. A dough whisk helps mix flour and water quickly, particularly with a stiff starter, but it is not essential. A digital scale capable of reading at least 1 g increments is the most valuable accessory because volume measurements of flour vary considerably.
Some kits include a rubber band or printed level marker. These are simple but effective: place the marker at the starter’s post-feeding height, then watch for doubling. A fabric cover can protect against dust, although a loose lid is often easier to keep clean.
Head-to-head: common kit choices
Basic live-starter kit versus dried-starter kit
A live-starter kit gets you closer to baking immediately, provided it arrives active and is fed on schedule. It usually needs refrigeration or prompt feeding. A dried kit costs less to ship and tolerates delays, but the first loaf may be several days farther away. For a beginner who wants visual confirmation that fermentation is working, the live option is usually easier.
Complete measuring kit versus jar-only kit
A jar-only kit can be excellent if it includes a good jar, feeding markings, and sound instructions. It becomes poor value when it adds decorative labels but omits a scale or gives feeding ratios only in cups and spoonfuls. A complete kit is worthwhile when you do not own a scale; otherwise, spend the difference on flour and a second jar.
Temperature accessory versus temperature-controlled appliance
A thermometer tells you what is happening, while a temperature-controlled device helps determine what happens next. Most starters perform well in a moderate room-temperature range around 24–27°C, though the correct schedule depends on hydration, flour, and inoculation. A thermometer is enough for many households. A device such as the Brød & Taylor Sourdough Home is a more specialized upgrade for cold kitchens, frequent bakers, or people who want repeatable fermentation timing. It is not necessary for a first starter.
How to set up a starter kit without wasting flour
- Wash and dry the jar. Use hot soapy water, rinse thoroughly, and let it dry completely. Residual detergent can affect aroma and mold risk.
- Weigh the starter. If the instructions do not specify otherwise, retain a manageable amount rather than continually adding flour to a large jar.
- Use a consistent feeding ratio. A common maintenance ratio is 1:1:1 by weight: for example, 30 g starter, 30 g water, and 30 g flour. This creates 90 g total starter and avoids producing more than you need.
- Mark the starting level. A rubber band makes the rise visible even when the mixture is full of small bubbles.
- Keep the cover loose. The culture needs protection from debris but should not be sealed during active fermentation.
- Feed according to activity, not the clock alone. If it rises and collapses quickly, it may need a larger feeding or a cooler location. If it barely moves, check temperature, flour freshness, and whether the culture is still reactivating.
A simple cost calculation explains why smaller maintenance quantities matter. At a 1:1:1 ratio, feeding 30 g starter uses 30 g flour per feeding. Feeding 100 g starter uses 100 g. Over seven daily feedings, the first approach uses 210 g flour, while the second uses 700 g—an extra 490 g before you have baked a loaf. A kit with a small jar is not automatically economical if its instructions encourage oversized feedings.
Proofing accessories: useful, but not part of every starter kit
Proofing baskets, also called bannetons, support the shaped dough during its final rise. A 9-inch round basket generally suits a medium loaf made with roughly 750–1,000 g of dough. A 10-inch oval basket accommodates a longer shape. Look for rattan or food-safe cane with a removable washable liner, and allow it to dry fully after use.
A lame or sharp scoring tool is useful once you are shaping loaves, but a starter kit that includes one should also explain safe blade handling and storage. A bench scraper helps with sticky dough and is more broadly useful than a decorative proofing cloth. A Dutch oven is valuable for crust development, but it is a separate baking purchase rather than a requirement for maintaining starter.
Cleanup, durability, and ownership costs
- What wears first: silicone covers stretch, fabric liners stain, rubber bands lose elasticity, and inexpensive plastic spatulas can split at the handle.
- What lasts: a thick glass jar, stainless-steel dough whisk, and stainless bench scraper can remain useful for years if dried properly.
- How to clean dried starter: soak the jar in cool or lukewarm water first. Very hot water can bake flour paste onto the glass. Scrape residue before washing.
- When a second jar helps: keep one jar for the active culture and use the other for mixing or storing discard. This prevents scraping around an active starter while it is rising.
- Common mistake: judging readiness only by the surface. A starter can look bubbly but still be weak; track its rise and fall after feeding.
Buying verdict
Choose a complete live-starter kit with a 750–1,000 ml straight-sided glass jar, loose cover, feeding markings, weight-based instructions, and a spatula if you want the easiest start. Choose dried culture if shipping, storage, or timing is your main concern. Add a digital scale before buying novelty accessories, and add temperature control only if your kitchen conditions make fermentation unpredictable. The best sourdough starter kits make feeding measurable, visible, and easy to clean—the three factors most likely to lead to a reliable first loaf.

Write Your Review
No reviews yet. Be the first to share your experience!